Where there is access to solid fuel, the good old Russian stove will always be relevant. It will warm the house, you can cook food on it, and such a unit does not depend on the availability of a centralized gas pipeline or electricity network. However, among a number of advantages there is a drawback - the complexity of the construction structure.
Want to make a stove, but don’t know how to fold a stove and equip a chimney? We will help you in the implementation of your plan. The article describes in detail all the stages of the construction of a wood-burning stove, provides practical recommendations on the choice of materials and outlines the technological nuances of masonry work.
Varieties of household stoves
Three types of brick stoves are distinguished depending on the main function:
- for heating;
- for cooking food;
- combined option.
The latter is intended for heating the home, and for cooking. To organize stove heating, an impressive chimney system with numerous channels is arranged at home. It should retain heat as much as possible from the combustion of fuel and flue gases in order to warm the air inside the house.
If you need a stove for cooking, they dispense with the usual vertical chimney, but a hob is arranged above the firebox. Under it, you can also make an oven. To create a combined version of such a stove, both a hob and a chimney that retains heat are used.
Depending on the type of device, choose a location. The heating furnace should not be placed close to the outer wall, otherwise part of the thermal energy will simply fly out. It is better to place it in the center of the room so that the air in different parts of the house warms up evenly.

A traditional brick wood-burning stove, if desired, can be equipped with quite modern elements to expand its functional purpose
To think over this moment is better when designing a house. A heating stove can become an object dividing a large room into several separate zones. Each of them will be warm.
With a hob, they act completely differently. In a closed kitchen, it is best placed close to two adjacent outer walls. This will allow the transfer of excess thermal energy to the outside, so that the room does not overheat during cooking.
Cooking ovens are set separately, in the open air. This is a popular element of the recreation area. Barbecue, barbecue, cauldron and other cooking appliances can be located nearby. On a cool evening, the heat from such an oven will pleasantly warm vacationers.
A combination oven, like a cooking stove, is placed near two walls, but it is better if they are internal. Then the heat will go not to the street, but to the house, and the kitchen will be moderately warm. The chimney is made massive, as for heating, but it is shifted towards the living rooms. As a result, thermal energy is distributed evenly throughout the house.
Preparation for work
For laying a stove with a stove, different types of bricks are used. Usually they take red corpulent for outdoor masonry and fireclay - to perform the inner lining of the furnace, as well as the smoke well.
The foundation is poured with concrete mortar. To prepare it, you will need cement not lower than M400, better - M500. The sand may be river or from the quarry, but it must first be sieved to prevent ingress of impurities. Water should also be taken clean. Another solution should be taken granite crushed stone about 30 mm.
Foundation filling is carried out using rubble granite, a suitable fraction is approximately 300 mm. In addition, you will need to prepare a solution of red clay and sand.
Instead of clay, you can buy clay powder, the order of its use is indicated on the packaging. All components must be of good quality, the integrity and service life of the future stove depends on this. To seal joints, you need to prepare a high-temperature sealant.
Work is performed using a conventional building tool.
You may need:
- containers for mixing the solution;
- Master OK;
- Bulgarian;
- plumb line;
- level;
- roulette;
- rule
- mallet;
- stove hammer;
- other devices for processing and laying brick.
To make a quality mortar, it is better to use a hammer drill or drill with the appropriate characteristics, as well as a nozzle designed for these purposes. A shovel and sieve will come in handy.
Wood stove construction
After the type of device is selected, materials are prepared and a suitable place is selected, you can begin work.
The process of creating a wood stove is conventionally divided into three stages:
- Foundation construction.
- The construction of the furnace itself.
- Creating a chimney design.
All work should be done clearly by technology. During operation, such a device heats up and is subjected to high loads. Even a small mistake in the future can turn into big problems. If in doubt, it is best to consult an experienced stove maker.
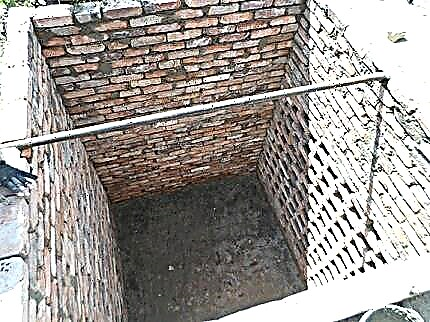
Separate foundation device
The base for the furnace should not be connected to the strip or column foundation of the house. The device is heavy, it will upset the base more strongly than the walls and roof. Therefore, even at the design stage, this point must be taken into account.

When creating a separate foundation for a brick kiln, it is important to properly backfill, be sure to reinforce, level and glue waterproofing
If the house is already built, but the stove is still needed, you will have to open the floor, get to the ground and fill in a separate base. An exception is a monolithic foundation, its bearing capacity will withstand such an additional load without noticeable deformations.

As a formwork, a usual sheet of roofing material reinforced with wooden supports is used, but instead of it, a plastic film can be used
First they dig a pit of the same shape as the base of the furnace, but a little larger, about 20 cm for each side, and a depth of about half a meter.

The concrete mortar for the foundation is mixed according to the recipe in a separate container so that it acquires the necessary density and homogeneous structure.
After that, perform the following operations:
- The soil at the bottom is carefully leveled and compacted.
- A layer of sand is poured to the bottom, it is also tamped and moistened, the recommended thickness of the sand cushion is about 90 mm.
- Lay sheets of roofing material on the walls, this is a waterproofing layer.
- If necessary, roofing material is strengthened with the help of boards and bricks, which act as formwork.
- A layer of crushed stone is poured and compacted onto the sand.
- A reinforcing mesh is made of a metal bar, a wire is used for knitting.
- A solution consisting of cement with the addition of sand and crushed stone in a ratio of 2: 1: 2 is poured into a third of the remaining height.
- The next cement-sand layer is poured (3: 1), leaving about five centimeters to the top of the pit.
- After that, lay another layer of the same mixture to the very top.
- The screed is aligned with the rule.
Now you need to wait about four weeks for the fresh foundation to freeze well.
It is recommended to moisten the surface of the base with water daily and cover it with a film layer so that the process runs evenly.

As reinforcing elements, a standard steel bar is used, knitting is carried out using a soft wire, observing a suitable step
After this, the formwork is removed, and the upper part of the base is covered with two or three layers of roofing material, which are glued with bitumen mastic. Waterproofing will protect the stove body from contact with moisture from the ground. The bottom layer of the foundation, if desired, can be made of cement and gravel, the recommended proportion is one to three.

For the last layer of the foundation, most often the reinforcement is performed separately, the net is knitted from the same rod as for the base
If the roofing material was not at hand, ordinary boards are suitable for the formwork, but they need to be covered with a plastic film to protect it from water. It is best to erect the foundation under the stove to the level of flooring or even slightly higher. It’s easier to do the finishing work.

The upper part of the foundation is carefully aligned with the rule and checked with a level. Better if it is flush with the floor plane
The part that rises above the floor, usually do a little more, for this the formwork is expanded. It also does not hurt to perform a separate reinforcement of the upper layer - a mesh with a pitch of about 75 mm will do.
Masonry order
To understand how to correctly lay a simple stove with a stove, the so-called dry masonry is first performed, i.e. lay bricks in rows, according to the plan, but without mortar. Instead, use pieces of plywood, slats or planks of a suitable size. The space between the individual rows should be the same.
If the brick lay down correctly, the dry masonry is dismantled, after which the masonry mortar is prepared and work is performed with it. The easiest way to use clay powder from the store. You just need to dilute it correctly according to the instructions and add sand.
Clay is a little more complicated. To begin with, you need to soak it with water for about a day. After that, sand is added to the mixture of water and clay in small portions and knead the composition with your hands to a homogeneous state. The amount of sand depends on how greasy clay is used.
As a result, the resulting mixture will become thick enough not to drain from the shovel, but to slide off it. In addition, the composition must not adhere to a metal tool. If the resulting mixture meets these characteristics, you can start laying. Here is an example diagram for a small combi oven.
First, marking is applied to the roofing material glued to the base.

The first row is always made only of whole brick. First, markings are made on the roofing material, a cord is installed. The finished row is checked by the level, it will become a reference point for leveling the rest of the masonry
The first two rows are made continuous, while the vertical joints between whole bricks in adjacent rows should not coincide.

Small cavities for the blower and chimneys are necessary to ensure proper draft as well as regular maintenance of the chimney
The next two rows are made with gaps for the blower and holes for cleaning the chimney. The openings are closed with metal doors.
Doors should be prepared before installation: drill holes in the corners, insert pieces of wire into them and wrap the frame with asbestos cord. Pieces of wire are laid in a solution between bricks.
The fourth row is made of fireclay bricks, since the firebox is already starting here. Part of the height of the brick is chosen, a grate is placed above the opening.

The grate separates the blown air from the combustion chamber space, which is necessary to create sufficient draft in the chimney duct
The fifth row is performed in the same way as the fourth. From the sixth to the eighth masonry continue to repeat, but leave a gap for the door of the combustion chamber.

The top of the wall between the firebox and the chimney needs to be slightly rounded, gently combing the edges of the upper layer of bricks. This measure will improve traction and prevent turbulence.
The row above the firebox door will become the base for the stove. Part of the brick around the perimeter is removed, laid with an asbestos cord and a cast-iron hob is placed on top.

The red line indicates the places where you need to select about one and a half centimeters, so that the stove is intended for cooking. Asbestos cord should be pre-impregnated with masonry mortar
If everything is done correctly, the stove and the upper side of the ninth row of bricks will be on the same level.

The side walls are an additional reinforcement for the brick structure, and a visor is needed to trap fat and fumes from food
Next, they continue to lay out the side walls and the chimney channel. This will take about six or seven rows. The next row should also include a visor hanging over the stove. To strengthen it, use a steel corner.

The height of the partition between the leftmost and the central channel is six bricks, a clearance of three bricks is needed for normal smoke circulation
It remains to lay out the chimney, its height is nine bricks. In this example, on the sixth row of nine, they stopped laying the partition between the left and middle channels. Thus, a gap was created for the free movement of smoke.

Next, two channels are covered with continuous masonry, and above the third the chimney pipe is led straight up. It should rise above the roof by 0.5-1.5 m, places of passage through the floors are carefully insulated
Now we need a solid masonry over the left and central channels.
In the right smoke channel in front of the last row of bricks, a gate is inserted and a gap is left for the chimney.

Such a relatively small stove of simple design will be appropriate in a small house or in the country. It will provide the necessary heating and cooking
It remains only to equip the chimney and perform facing work, if necessary.
Important nuances and tips
Experienced stove makers sometimes ignore the dry masonry stage, but for beginners it is required. This will help to understand the internal structure of the stove, all its channels and cavities in order to prevent possible errors.

Refractory chamotte bricks are used for the firebox, the pipe and the massif of the stove are laid out of solid red brick. Silicate brick in the construction of furnaces is prohibited. Each element before laying should be cleaned of any contaminants.
In almost every row, some bricks are customized in size. Experienced stove makers advise separately disassembling the elements of each row when disassembling dry masonry. You can also take a marker and put a row number and a place number of an element in the masonry on each brick.
Instead of mortar in dry masonry, it is most convenient to use wooden slats of the same thickness. They will be useful in the future to control the amount of mortar between the bricks.
The work is performed as follows:
- Each row during the “wet” laying is first laid out dry to once again check the position of all the elements.
- On the bottom row, narrow rails are used that are used previously.
- A layer of a solution of about 10-12 mm thick is applied on top.
- Lay a brick and beat it with a rubber hammer until it settles on the mortar to the level of the rails.
- The masonry is continued in the same way.
- After removing the slats, the resulting cavities are filled with a solution.
- The resulting fresh seam must be immediately embroidered to give the masonry an aesthetic appearance.
Reiki is taken out only when the row is the third or fourth from above. Now they can be reused. For work, you need about four sets of such rails.
Each row that is laid on the solution should be checked by level and plumb to the position relative to the horizontal and vertical.
Chipped bricks cannot be used in the masonry of furnace parts subjected to constant temperature loads. In general, it is undesirable to use elements with cracks and chips in the construction of the massif and chimney. Chipped brick is allowed to be used only in the filling of the base under the foundation of the stove.
The old brick obtained by disassembling the destroyed structures is suitable for laying the foundation, if it is not badly damaged.
The quality of the masonry largely depends on the adhesion strength of the brick and mortar.
To improve this moment, experienced craftsmen recommend:
- Before laying, the red brick is soaked for 7-10 minutes. Fireclay need only dip in water and shake off the drops.
- Lay the brick in place with one clear motion, without shifting or tapping it.
- Apply only the required amount of mortar to the masonry site. Seams with an array should not be more than 5 mm, in the firebox - no more than 3 mm.
- In the process of laying, you need to “mop”, i.e. rub the inner surface of the chimney sweeps and the chambers of the furnace with a rigid brush to create the smoothest possible surface along the path of the flue gas flow.
If it was not possible to immediately put the brick in place, the element itself and the place where it is installed should be completely cleaned of the mortar and the masonry should be done on a fresh layer of the mortar.
When laying the pipe, it is allowed to use only red solid brick, which tolerates the effects of acid deposits and temperature changes. The smoother the inner surface of the chimney, the better the draft and less blockages. It is possible to process the inside of the pipe with liquid glass.
On our site there are articles with a detailed description of the construction technologies of different types of brick furnaces, we recommend that you read
- DIY mini Russian stove: specifics and orders for the construction of a compact stove
- DIY do-it-yourself stoves: construction manuals with diagrams and procedures
The scheme for creating a small heating and cooking stove:
The construction of a furnace equipped with a drying chamber, according to the drawings of Proskurin:
The laying of the furnace does not endure hustle and bustle. It is necessary to think over and carefully carry out each stage of the work in order to obtain the desired result. Better to start with a small design, as described above. Having gained experience, you can proceed to the construction of more complex furnaces: with an oven, a drying chamber, arched openings, etc.
Have experience building a stove with a stove? Please tell readers about the technical nuances of arranging the foundation and laying the solid fuel unit. Comment on the publication, participate in discussions and add photos of your homemade products. The feedback block is located below.